A blog by Gabriel Rocha
Cybersecurity Homelab using Proxmox
Overview
This isn’t going to be a step-by-step guide on how I built mine. I mostly followed a guide from David Varghese: https://blog.davidvarghese.net/posts/building-home-lab-part-1/ he does an awesome job of walking you through how to configure each VM and makes it easy to follow. I haven’t followed his guide to a tee and didn’t make every VM he went over. I really wanted to learn more about Proxmox, so I decided to make it there. Proxmox brought up some different challenges along the way that made this project a little troublesome at times, but I ended up learning more along the way!
Why build a homelab?
For myself, I wanted a safe environment to learn tools like Wireshark, Nmap, and Splunk. In this lab, there are also intentionally vulnerable VMs like Metasplotiable and my AD environment, which you can attack. I choose to make my own lab first vs. going onto Hackthebox or TryHackMe because I believe that I’ll be able to better grow my skills this way. Not to say that those sites are bad, and I do plan on using them in the future, but designing and executing my own scenarios also sounds really fun! Another reason I went with Proxmox was so I could access my homelab from my couch on my MacBook. You could also easily add a VPN to your server and access it from anywhere!

You don’t need an entire data center to build a homelab, chance’s are you already have what you need right at home. For mine, I’m using an old gaming desktop with an i7-9700k, 16 GB of RAM, and 1 TB of storage. If you have to buy something, I’d recommend an old HP or ThinkCentre mini desktop. You can usually pick them up for under 100 dollars. You’ll also need to pay attention to how many cores your CPU has, as each VM will have at least one core, so keep that in mind. Also you might want to upgrade the RAM, preferably 32 GB, and maybe throw in an SSD to speed up an older device. But when it comes to homelabs, using what you already have is the best practice!
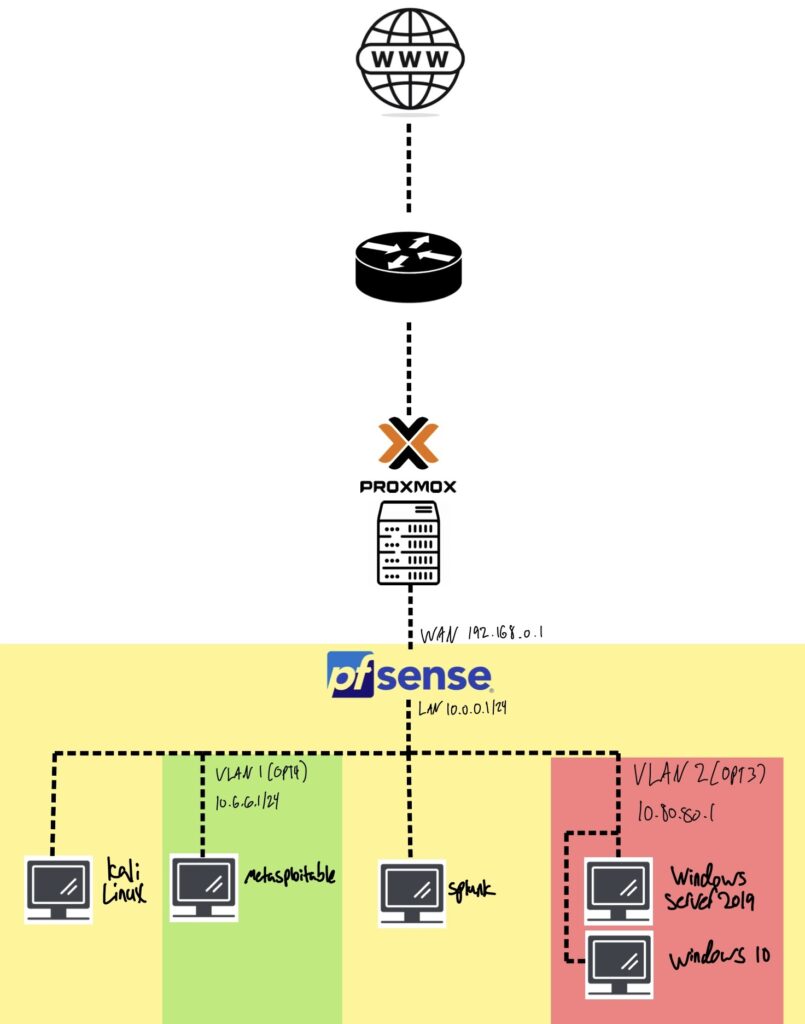
Homelab Topology

Proxmox Challenges
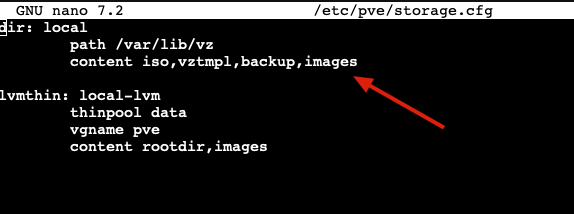
Getting Metasploitable up and running was a bit different as it’s not how I’ve normally created VMs in Proxmox. The first challenge was finding a good download link for Metasploitable. The first few I came across were bad links, and it took a bit of doing, but I eventually came across this link that worked: https://sourceforge.net/projects/metasploitable/files/Metasploitable2/metasploitable-linux-2.0.0.zip (WARNING!!! you should NOT download random files from the internet, proceed at your own risk) once I got that I followed this great guide by Paul Korma and I was almost done. After all that, my VM still didn’t run. I didn’t get a screenshot, but I kept running into an error stating, “Images weren’t supported.” or something similar. So, I had to go to /etc/pve/storage.cfg and add “images” to this line (see the below image) After that, Metasplotable finally ran!

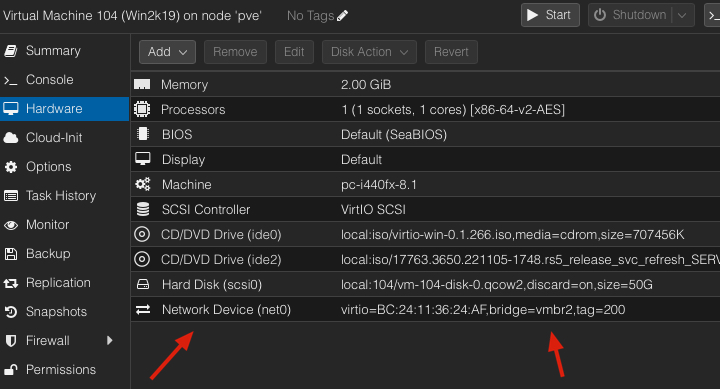
The next challenge was creating VLANs on Proxmox, after some research, there are a few ways to do it. I followed this YouTube video by Divgitally, and he made it really simple. If you’re following David’s guide, you’ll want to use the YouTube guide during David’s pfSense configuration and specifically the interface creation step. (Side note: you can skip the firewall rules section on the YouTube video as those are different than what we’ll use). Lastly, make sure you select whatever VLAN you created on your VM for its network device (see below).

Creating Windows VMs takes a bit of doing, but if you follow this documentation provided by Proxmox, you’ll be good to go. If you make a mistake on this step, I’ve have been stuck with a VM that won’t shut down. To fix the issue, go to the shell tab for the Proxmox server and perform the following steps.
- Find the Process ID (PID): ps aux | grep “/usr/bin/kvm -id VMID” (Replace VMID With YOUR VMID Example: 101,102,103…..)
- Terminate VM: kill -9 PID (Replace PID with YOUR PID, use this only when you’re certain it’s the right one.)
Final Thoughts
After I configured each of the VMs, I went ahead and took a snapshot of each so that when I inevitably break something, I can restore its backup. Something to note with these VMs: you don’t want to leave them running 24/7 as they’re intentionally left vulnerable, so make sure you turn them off when not in use. I’m very excited to get going on some future projects; I hope to be creating some step-by-step guides on tools and attacks very soon! Happy Homelabbing!
